01 - Introduction
Bitsboard is a fantastic learning tool to absorb new facts and information in a fun new way.
What makes Bitsboard unique?
Play dozens of mini-games: Bitsboard includes dozens of fun and addictive mini-games that make learning fun and enjoyable regardless of whether you are 1 or 99 years old.
Huge catalog of content: Through the Bitsboard catalog you can instantly access thousands of carefully curated lessons by fellow teachers, parents, and students from all over the world.
Fully customizable: Bitsboard is fully customizable. You can easily create your own boards, add multiple users, and tweak the settings of every game to your liking.
Share everything: Bitsboard is a global learning platform. You can share your custom lessons with one click with anyone via the Bitsboard catalog.
Ready to explore more? Then let's dive in!
02 - The Home Screen
From the Home Screen you can instantly select a board and start to play and learn.

1. Switch Users: Click on the user profile image to switch between different users
2. Select Board: Click on any board to instantly launch the Bitsboard games.
3. Browse Boards or Collections: Click on the Boards to view all of your Boards. Click on Collections to view various collections of boards. You can create new collections when you edit your boards. You can add boards to multiple collections by student, class, subjects, etc.
4. Bitsboard Catalog: Go to the Bitsboard catalog to download new lessons and flashcards. The catalog is loaded with thousands of carefully curated content across a huge variety of topics.
5. Search: Search your boards and collections. Once you have downloaded hundreds of boards, the search feature offers a lightning fast way to quickly find what you are looking for.
6. Settings: Click on the settings button to customize, share, and backup your boards and to customize your learning preferences and adjust the settings of any game.
7. Track Your Progress: See at a quick glance how familiar the user is with any board. A full circle means that they are very familiar with the content. A blank circle means that they are just getting started.
8. Add Boards: You can add new boards directly from the home screen by clicking on the plus button.
Play and Learn
We believe that the best way to learn is through playing! After all, everyone loves to play. So if it feels like a game, users will stay happy and engaged much longer and they won't even realize that they are learning.
To make learning fun and addictive, we are incorporating dozens of mini-games into Bitsboard.
Every game in Bitsboard can be launched with just one click. Just select the board you would like to work on and then select the mini-game from the game launcher.

03 - Bitsboard Catalog
The Bitsboard catalog contains thousands of carefully curated lessons from fellow parents, teachers, and students. Each board contains a series of flashcards (i.e. bits).

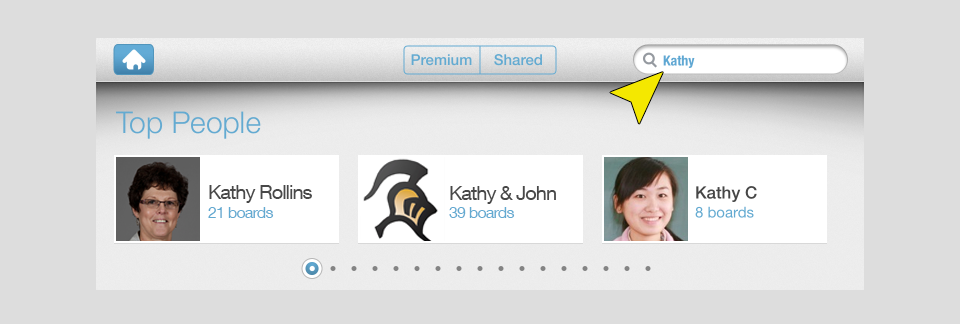
You can browse through premium featured topics to quickly find some of the most popular boards or you can search for specific boards using the search box.

Teachers love Bitsboard because it allows them to quickly create and share boards with all of their students. As soon as you have created a new board all you have to do is click on the "share" button and voila... your board is now available for anyone to download from the Bitsboard Catalog.
You can quickly find boards in the catalog by using the search box.

You can also search by user name to quickly find all of the boards from your favorite teachers on Bitsboard.
Just think of how much easier and more fun it is to suddenly share new vocabulary, lessons, flashcards, etc. with your students. All they need to know is the name of your board in the Bitsboard catalog and then they can instantly download it with just one click.
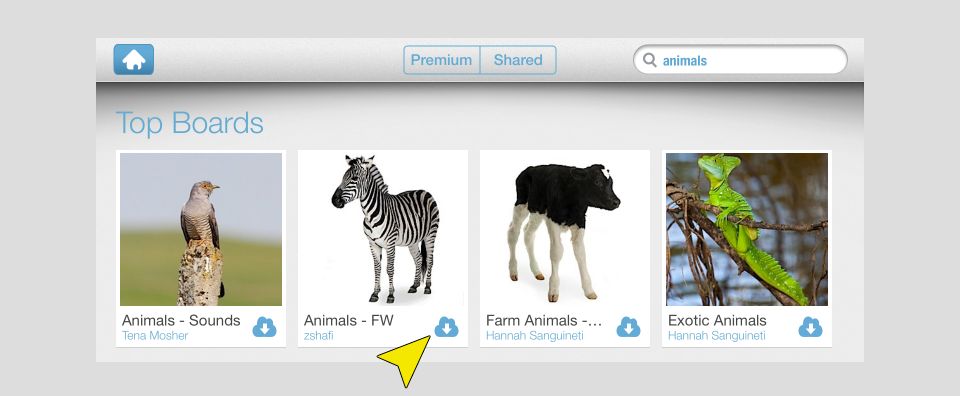
Download your first board
Once you find a board on the Bitsboard catalog that interests you, you can download it in just one click by pressing on the download button.
04 - Create and Edit a Board
One of the things that makes Bitsboard magical is how fast and easy it is to create your own lessons. The reason for this is quite simple. You instantly get full access to the Bitsboard Catalog of images when creating new items so you don't have to spend hours trying to find the right images.
To customize Bitsboard, you first click on the settings button in the top right corner from the home screen.

Once you are on the settings page, select "Boards" to review or edit existing boards or to create a new board.
To create a new board, just click on the plus button and you will see a series of options.
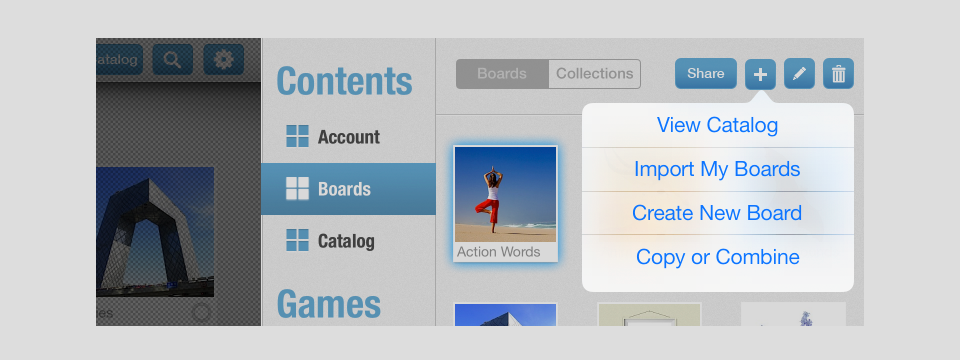
- View Catalog: This sends you to the Bitsboard catalog to find and download a new board.
- Import My Boards: This lets you view all of your boards that you have previously shared with the Bitsboard catalog. This way you can rapidly download your boards on any device or restore boards if you had to reset your iPad.
- Create New Board: This lets you create a new board
- Copy or Combine: This lets you copy a single board or combine multiple existing boards into one new board.
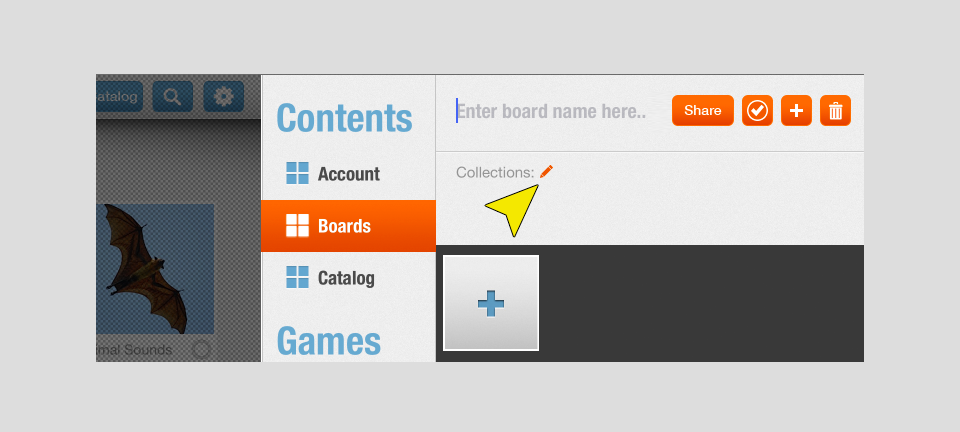
Once you select "Create New Board", a new board will be created. The next step is to enter the name of the board at the very top of the screen as indicated below.

Once you have added the name of the board, it's time to add your first card by clicking on the "+" sign.

This will open up a blank new card. The first step when creating a new card is to add the label (i.e. word, phrase, or sentence) such as "strawberry." As soon as you press "done" or close the keyboard, Bitsboard will load a series of suggested images (if any are available).

All you need to do next is select the picture that you would like to add by clicking on any of the thumbnails at the top and the picture will automatically be added for you.

If you are creating cards with text only, then you can remove the image by clicking on the "X" button in the top right corner.

If you like to add your own images, then all you have to do is click on "Add Media" in the center / main area where the photo will appear.

As soon as you tap on Add Photo you will see the following options.

You can add photos from:
- Photos from Library - access your photo albums
- Camera - to take new photos
- Search Bitsboard - to find great images from our catalog
- Web Search - to find great images online
- Facebook - to add photos from your Facebook account
- Flickr - add photos from your Flickr account
- Picasa - add photos from your Picasa account
- Dropbox - add photos from your Dropbox account
To add a recording to the new card, just press the record button.

You can check your recording by pressing the play button.

You can also add a description to each card (bit). Adding descriptions is great for adding definitions, examples, translations, etc.

Bitsboard also allows you to specify related items.

Related items enables you to customize the games / specific screens that users will be seeing while playing games.
Here is an example. Say you want to create a lesson that helps users to learn their letters. Many students struggle with similar letters such as b, d, p, and q. In Bitsboard, you can mark these related letters so that they will appear as the trick / distractor tiles in games such as Photo Touch.

Once you have selected which items (if any) in the board are related to the card (bit) that you are looking at, you will see that while playing games they appear as the trick / distractor tiles.

Adding related items is entirely optional. If you do not specify which bits are related, then while playing games, Bitsboard will always randomly pick other bits from the same board. It is just a great advanced feature for those that want more control when creating lessons, boards, and games.
05 - Organize Bits and Boards
There are two primary ways to organize your bits and boards.
Arrange your cards in any order
Someones when you are creating a board, you may want to specify the order of each card (bit) within the board. This is extremely useful when you want to create a story or for any other lesson where the sequence in which you display information is important.
Well, you can now easily re-arrange all of the cards within each board into your desired sequence.

All you have to do is to tap on one of the image thumbnails (cards) and keep your finger pressed for a second. Then start to drag the thumbnail into the desired place. Cards are organized from top to bottom and from left to right. So the first 4 items appear in the first row from 1 to 4.
Change the Board Thumbnail
Even if the sequence of the cards does not matter, sometimes you will want to update the thumbnail (the main image) that you see with each board on the home screen. To change the image, all you have to do is tap on any other image within the board and drag it to the first position.
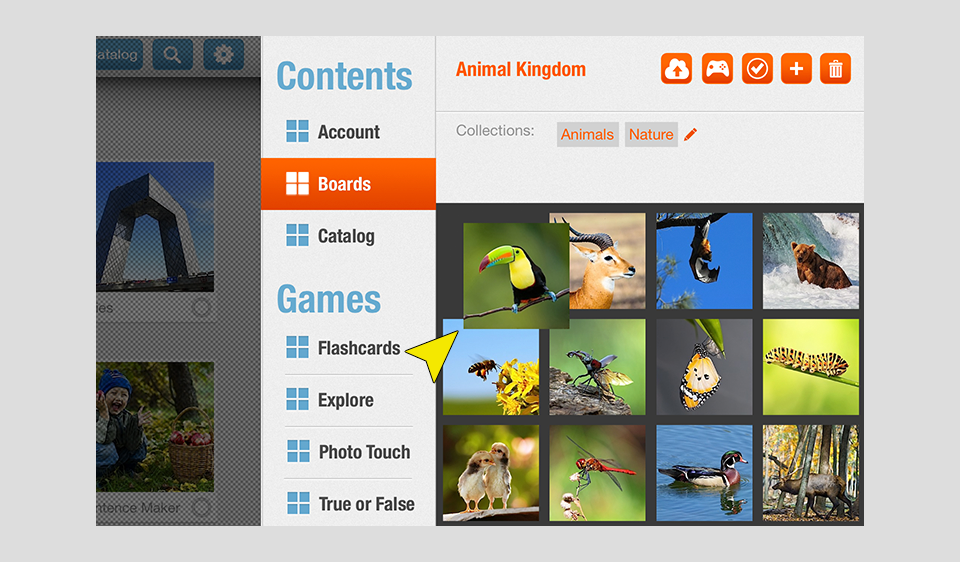
In the example above, the image of the Toucan is being put into the first position (the top left slot) and it will thus become the thumbnail of the board.
Voila! Your board now has a new image thumbnail. :-)
Create Collections of Boards
You can add boards into one or multiple collections. This allows you to create collections of boards by class, topic, student, etc. Collections make it possible to download hundreds of boards and still be able to quickly and easily find them.
To add a board to one or multiple collections, just press the edit pencil that you see while you are reviewing a board.
As soon as you start typing, you will see a list of your existing collections.

You can select any of the existing collections to add it or you can just create a new collection by entering the desired name with the keyboard and then press on the "NEXT" button on the keyboard.
Each time you add a collection, you will see it being added like this.
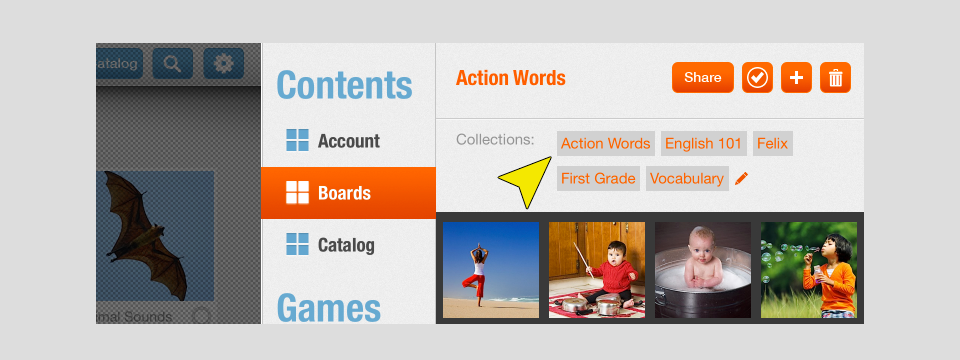
You can review and manage all of your existing collections by clicking on the Collections toggle from the main edit boards settings page.

Collections look different from boards in that they show up to four images instead of just a single image in the thumbnail.

You can delete entire collections by pressing on the delete button.

As soon as you do, you will see a delete icon appear. Press on the X button to delete a collection. You can also delete collections and boards by pressing on the item you want to delete until the X button appears.

When you delete a collection the boards inside the collection are NOT deleted.
You can also click on a collection to view all of the boards that are currently part of the collection.

In the example above, you can see that there are currently four boards in the "First Words" collection.
You can click on the Collection name or the pencil icon in the top bar to change the name of this collection.

Press on the delete icon to remove individual boards from a collection.
When you remove a board from a collection you are not deleting the board. You are only telling Bitsboard that this board no longer belongs to this particular collection.
06 - Find Boards
Finding boards is super simple and easy. When you are just getting started, the fastest way to find your boards is directly on the main screen. However, once you have downloaded a dozen boards using Collections and the Search box become the fastest and easiest way to quickly find the board that you are looking for.
Search for Boards
If you know the name of your board, then you can instantly find it by using the search box from the home screen.
To search for boards or collections, just click on the search button on the home page.

You will instantly be able to browse through all of your collections and boards and as soon as you start typing, Bitsboard will show you all of the collections and boards that are available.

Now just select the board you want to launch and of you go.
Use Collections
Collections are incredibly powerful, especially if you are using Bitsboard for multiple students or subjects. Once you have dozens of boards Collections will become your best friend. Think of collections like folders with one big difference. Each board can be part of one or multiple folders.
You can instantly view all of your existing collections by click ing on the Collections toggle in the top navigation bar.

Once you click on collections, you will see all of your existing collections sorted from a to z.

As soon as you click on a collection, you will instantly see all of the boards that are part of the collection.

Not only that, every collection gives users the option to play ALL of the items that are part of a collection at one time. You can do this by clicking on the very first thumbnail. The one with the four images that says "Play All."
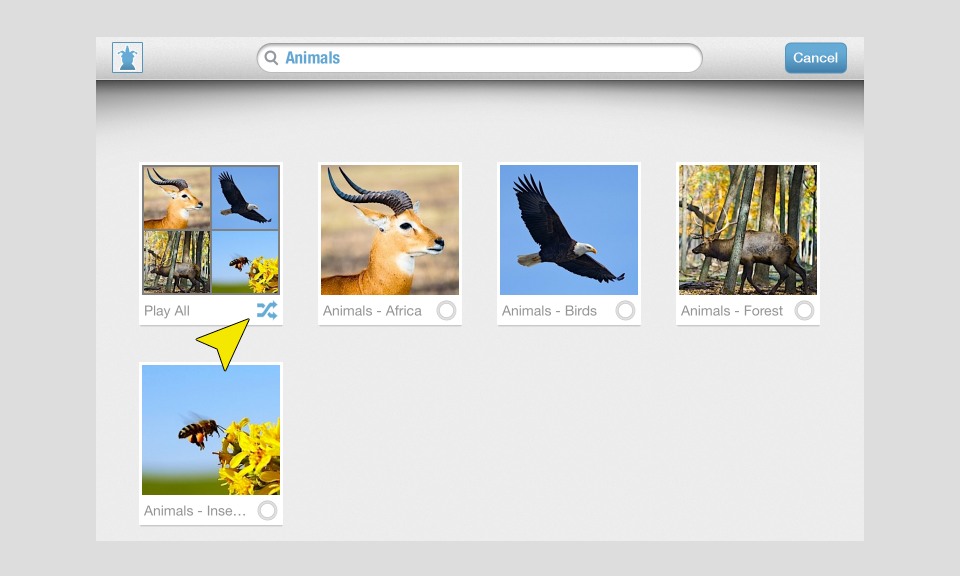
This is an excellent way to immediately review an entire subject and test your overall level of comprehension.
07 - Share Boards
Once you have created a new board or a collection of boards you can share with just one click by pressing the share button.
Why share boards?
Sharing boards means that you can download a custom board that you have created on an unlimited number of devices. If you have a classroom full of kids or multiple iPads at home, you will realize that this is a huge timer saver.
You can click on the share button while editing a board to share a single board with one click.

Or you can also click on the share button while viewing all of your boards to share multiple boards at one time.

Just select the boards you want to share, then press the share button and voila you are all done.

As soon as you click on "share" your board will be uploaded to the Bitsboard catalog and becomes available for anyone to download. All you have to do is let your students know the name of the board so that they can easily find it on the Bitsboard catalog.
TIP: If you have already published a board on the Catalog you can always update it by first making changes to the board on your device and then pressing the "Share" button again. This way you can update the board name and add, edit, or delete any card you like.
Backup your data
We strongly encourage your to always share any custom boards that you create. Why? Sharing boards with the Bitsboard catalog also means that the boards will be uploaded and backed up online. This way no matter what happens to your device or to your app, you will never lose any of your custom boards.
Once you have shared one or multiple boards, you can always view them in the Bitsboard catalog. There are two ways to access and view the boards that you have shared.
The first way is to click on "Import My Boards" when adding a new board.

The second way is to open the Bitsboard catalog and then click on "My Boards" in the top.

From the "My Boards" section in the catalog you can download all of the boards and collections that you have previously shared and download them with just one click.

Use Dropbox for Private Backup and Sharing
You can also share boards privately by using your own Dropbox account. Sharing via Dropbox is also super simple and easy.

Just select Dropbox from the drop-down menu and the board that you wanted to share will automatically be uploaded into your Dropbox account. This is an excellent way to always backup all of your boards. You can also import the boards that you have saved to Dropbox into any other Bitsboard app on any other device.
08 - Manage Users
Bitsboard allows you to add as many users as you like. This way you can create a custom learning environment for every user. This is really important so that you don't have to keep tweaking all of the individual game settings and preferences. They are always stored at the user level.
For example, if Felix is just getting started, you can limit the Photo Touch game to show a max. of 4 images. For Sonya, who is much more experienced, however, you could set the max. number of images on Photo Touch to 16. Instead of having to keep changing the settings, all you now have to do is to switch between the users which can be done in two clicks.
To switch between users, just click on the user thumbnail in the top navigation bar.

You can also switch users by clicking on "Account" on the settings page and then clicking on the user icon in the top right.
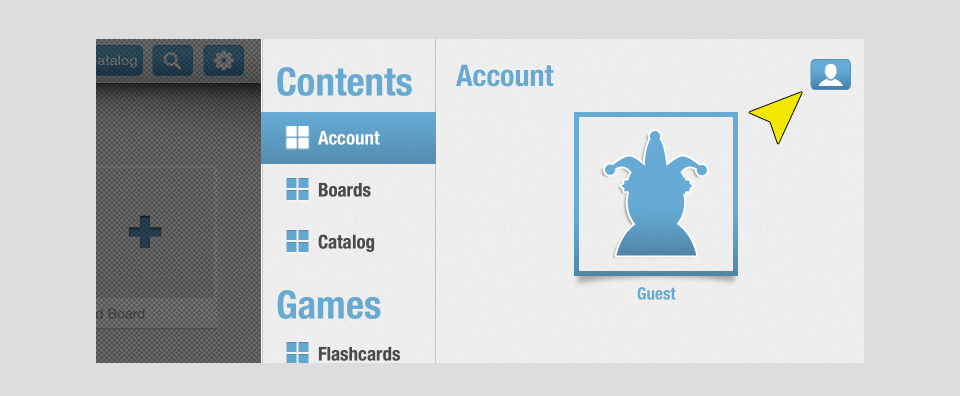
On the main user page, you can either select a user, select the guest account or click on the plus button to add a new user.

Now select to either add a new user, login an existing user, or login with Facebook.

You can create local user accounts or register a new user.
A local user account is great for adding your kids or your students because you don't need to add any email or password.
A registered user is great for sharing your boards online and for backing up all of your boards.

Once you have added a user, you can easily customize the entire app for the user by tapping on the user name. When you do, you will see the following options.
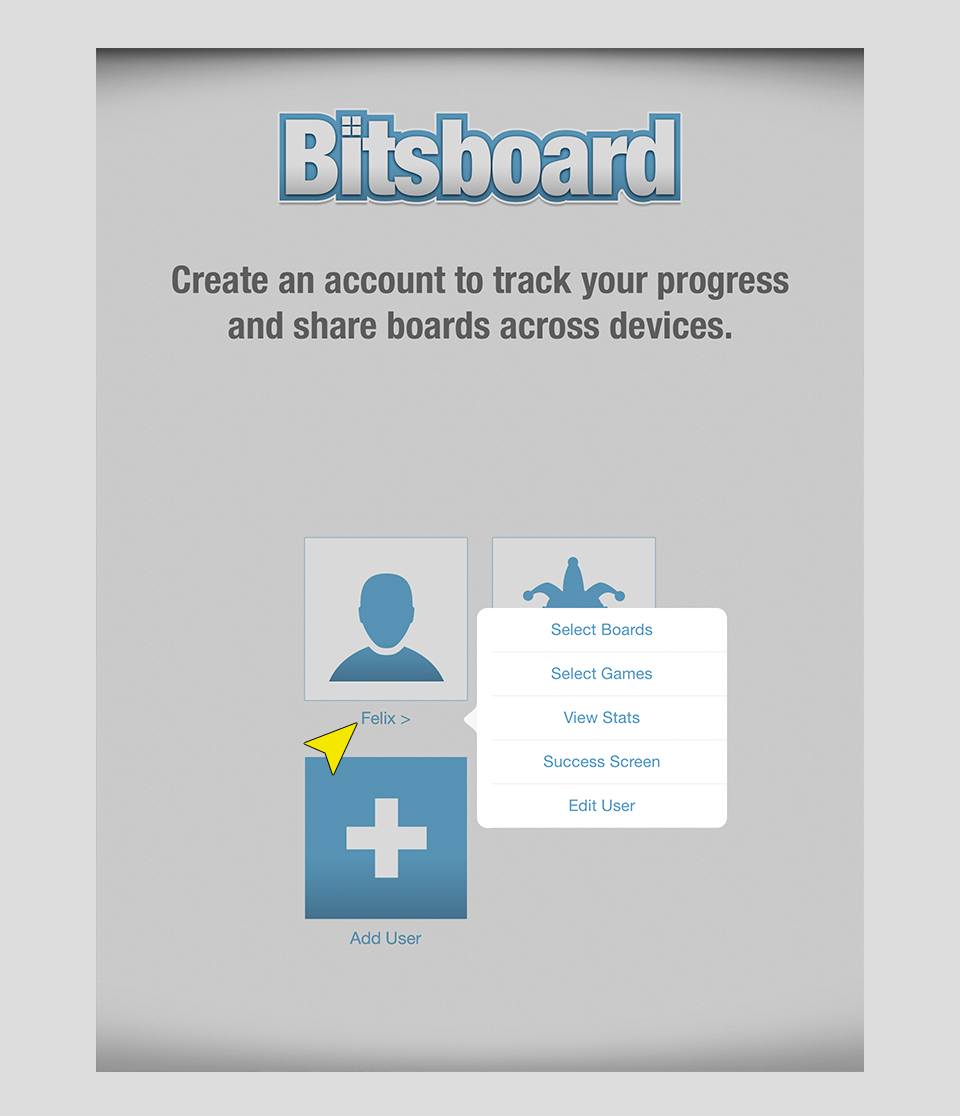
Select Boards allows you to turn individual boards ON and OFF for each user. That way you can easily control exactly what content each user has access to.

Select Games allows you to turn individual games ON and OFF for each user. That way you can easily control which games each user has access to.

View Stats allows you to see how every user is performing. It's an easy way to review the scores and activities of each user.

09 - Adaptive Learning
Bitsboard offers a simple yet incredibly effective adaptive learning algorithm that works seamlessly in the background without getting in the way.
The best way to take advantage of Bitsboard's adaptive learning algorithm is to create a unique user account for each student.
Why is this so important?
Because every time you play a game on Bitsboard, what you see is based on how familiar you already are with the content. If you are already very familiar with the content, then Bitsboard will mix it up and show you a lot of variety. However, if you are struggling with the content, then Bitsboard will slow things down and focus more on repetition to reinforce learning.
Kids love learning while they are having fun and learning is fun when it is not too boring and not too challenging. The amount of difficulty has to be just right and Bitsboard has spent years refining an algorithm that keeps kids engaged, having fun, and learning at the same time.
Once you have created a unique account for each user, there is nothing else you have to do to take advantage of Bitsboard's powerful adaptive learning algorithm.
While Bitsboard's adaptive learning algorithm is both incredibly simple and powerful, we realize that no one is more qualified to create a customized learning environment than parents, teachers, and students. That's why Bitsboard offers a ton of options to let you tweak the settings for each student.
Customize Games for Each Student
When you create multiple users, Bitsboard automatically saves the settings for each game at the user level. That means that if you have one student that is excelling at Photo Touch while the other is struggling, you only have to customize the game settings once for each student.
For example, imagine you have a student called Felix, who is making tremendous progress and loves the challenge of having to find the answer from many options while playing Photo Touch. For Felix you could set the min. number of images to 4 and the max. to 16. If you have another student, let's call her Sonya, that is struggling. You could set the min. number of images to 1 and the max. to 4.
Voila! Once you have configured the settings for each student you are all set. You won't have to keep going back and forth. Since Bitsboard contains dozens of configurable games, saving the custom settings at the user level is a huge time saver.
Select Which Bits to Study
Sometimes, you might want to gradually introduce and cover new content. Instead of having to keep adding and deleting items from a given board, you can just "select the bits to study" from the settings page for each board.
Here is how to find this option in Bitsboard.
Step 1: Go to the Bitsboard settings page.
Step 2: Select the board you want to work on and click on "edit"
Step 3: Now click on the checkmark in the top right corner to select the bits you want to study.

Step 4: Now make sure that only the items you want to study show a checkmark next to the thumbnail.

This way, if you have a board such as ABC and you only want to work on the first six letters of the alphabet, you can just turn all of the other items off.
Please note that the "Select Bits to Study" options are NOT stored at the user level. The reason is that it just becomes too hard for users to remember what items within each board they have turned on and off at the user level. Plus, if you truly want to save these settings for each user, then just create a custom board for each user. That's really easy to do by just making a copy of the exiting board and then adding it to a collection for that particular user. Voila! :-)
10 - Track Your Progress
Bitsboard automatically stores how each user is doing for every game and board within Bitsboard. On the home page, you can see at a glance how familiar the user is with any given board by looking at the progress indicator.

A full circle means that the user has done really well. Specifically it means that they have answered each of the items in the board correctly the last three times they have been tested on them.
For example, if a board contains 10 items, then the only way to get to 100% progress means to answer all of the items correctly three times in a row.
Please note that the overall progress is being calculated at the board and not at the game level. It is more a measure of familiarity than mastery. For example, you can earn a full progress circle just playing Photo Touch. However, that does not mean that you also know how to read, write, and spell,all of the content of the board.
If you want to see how well someone is doing for any particular game, such as Photo Touch, just have them play a round and then review the scorecard at the end.

You can click on "All Time" to see how the user has done over the last 10 rounds for each game.

The scorecard tracks the user's performance at the game level. In other words, if you are looking at the scorecard for "Photo Touch" then you know how the user has done historically while playing Photo Touch. If you want to see how they have done while playing "Spelling Bee" then have them complete a session and look at the Spelling Bee Scorecard at the end.
You can easily view the activity of each user from the main user screen by tapping on the user name as illustrated below.

11 - Dropbox Support
You can now import and export your boards directly from Dropbox. This gives you three key advantages.
A. Import Boards From Your Computer
If you prefer to create your own content on your computer, you can now do that and import it easily into Bitsboard from your own Dropbox account. Here is how this is done.
First upload a board to dropbox

The moment you upload the first board to Dropbox and allow Bitsboard to connect to your Dropbox account, you will notice a new Dropbox folder called Bitsboard in your Dropbox account.
Dropbox > Bitsboard
Inside the Bitsboard folder, you will automatically find three example boards.
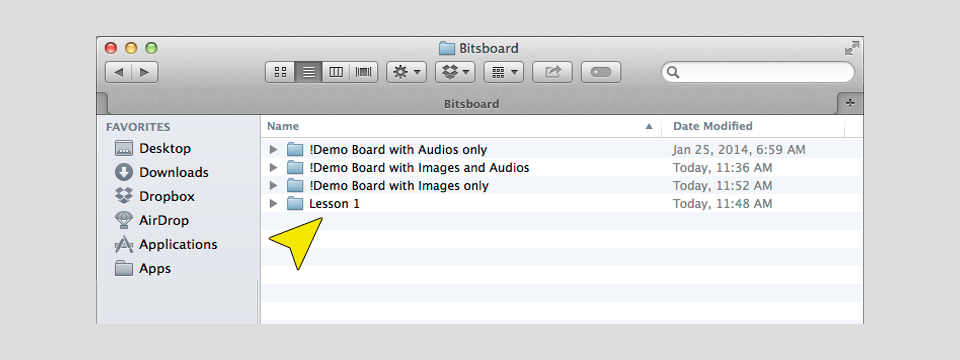
All you have to do is follow the same structure to easily create your own boards and import them into Bitsboard.
In summary. Every board = a folder.
So if you create a folder called "Lesson 1" then when you import this folder into Bitsboard, you will have a new board called "Lesson 1"
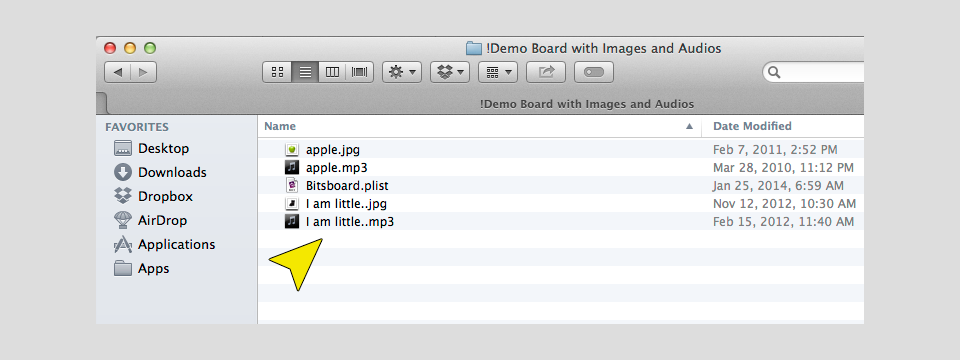
Inside the "Lesson 1" folder, you can put both images and audio files. For example, if you want to add a Flashcard with the label "apple" then just have both the audio and the image labeled "apple" like this:
apple.jpg (or .png)
apple.mp3
The easiest way to get familiar with what the content inside the folder should look like is to first share and upload one of your existing boards from the app into Dropbox.
If you want to import boards with images or audios only, that's fine too.
Lastly, you can also specify the collection(s) that you want each board to belong to if any. You do this by updating the BItsboard.plist file.

It sounds more scary than it is. Just copy and paste the Bitsboard.plist file from one of the example folders into your own folder, open it, and then rename the "Collection 1" and "Collection 2" names to what you would like. If you only want to add the board to one collection, then just delete the entire row with the second collection name.
B. Backup and Share Boards Privately with Dropbox
Now that Bitsboard supports Dropbox, you can easily backup and share all of your boards and lessons privately. This is ideal if your boards contain personal details that you might not like to share.
Secondly, it is always a good idea to keep your own backups. While we do our best to ensure that we never lose any data, creating a personal backup of all your Bitsboard boards in your own Dropbox account is even better.

C. Easily Import Your Boards On Any Device
Once you have uploaded your boards to Dropbox or created your own lessons on your computer, you can import them with just one click.

12. Turn Games ON and OFF at the User and Board Level
We have frequently heard that while teachers and parents love all of the games that Bitsboard offers, at times the app can feel overwhelming because for some boards and for some users certain games are not relevant.
For example, a two year old is not old enough to play the "Spelling Bee" game. Also, if you have a board on just letters, then certain games such as "Word Builder" make no sense.
Well, it is now possible to turn games ON and OFF at the user and board level. :-)
Turn Games ON and OFF at the User Level
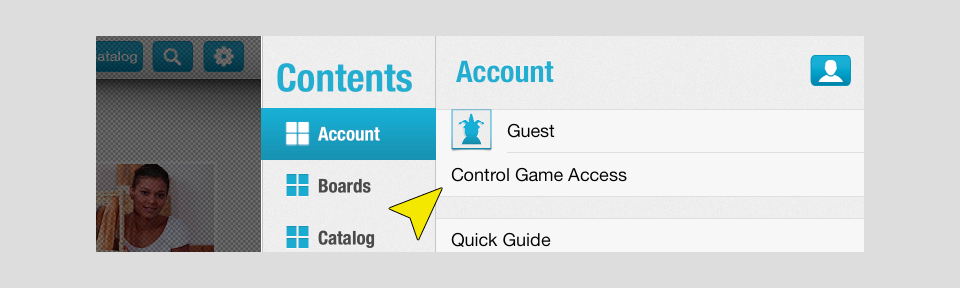
To turn games ON and OFF at the user level, just click on the settings button and then go to the accounts page.
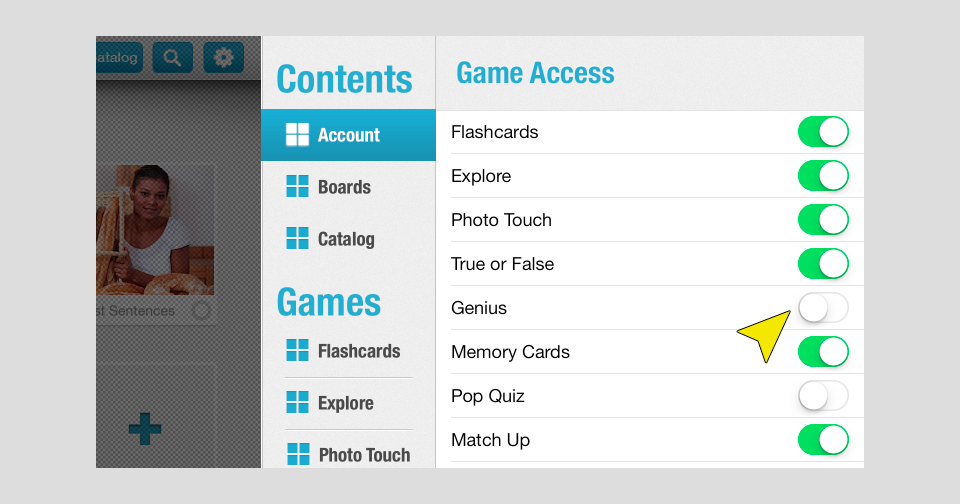
Once you are on the accounts page, click on "Control Game Access"
You can also turn games on and off by first tapping on the username on the main screen you see to select a user and then tapping on select games.

From the "Control Game Access" page, you can turn individual games ON or OFF at the user level. Once a game is turned off, the user will never see this game as one of the options.
Turn Games ON and OFF at the Board Level
To turn games ON and OFF at the board level just go to Settings > Boards and then select the board that you would like to edit.
Once you are here, click on the joystick / game controller icon in the top bar.
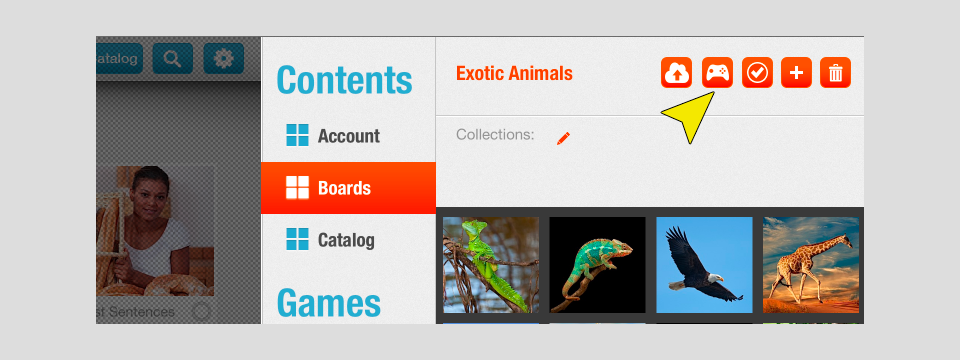
Now just click on the ON / OFF button to turn individual games ON or OFF for the given board.
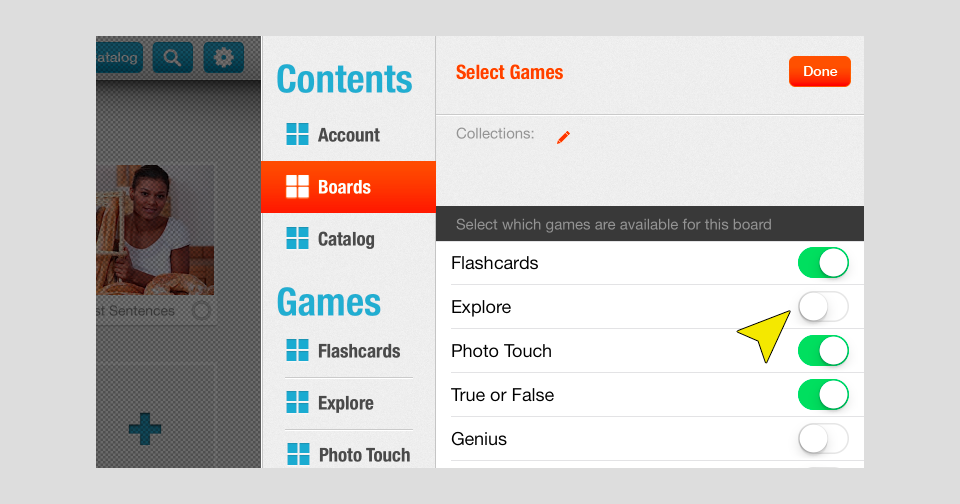
When you share a board on the Bitsboard catalog, the game settings are saved and stored as well. This way, you don't have to update and configure each board when you download it onto another device. :-)
13. Bitsboard for Preschoolers
To make Bitsboard more fun and exciting for little ones, we have added two exciting new features. Both of these features are available by going to Settings > Account.

From the user's account page you can now configure custom success sounds as well as decide what kind of a reward screen to display at the end of each session.
Custom Success Sounds
To encourage and reward users you can now play custom success sounds such as (awesome, good job, etc.) instead of just playing a generic sound each time a user gets a correct answer. If you want to enable the custom success sounds be sure to turn them on.
You can either use the success sounds that come pre-loaded with the app or record your own.

All of these settings are saved at the user level. This means that you can create custom success sounds using the users name such as "Awesome Felix!." You can also turn success sounds on for some users and leave the setting off for other users that prefer to just hear a beep.
Success Screens - Stickers vs. Scorecard
While showing a scorecard is great, we frequently heard that it is not fun and engaging for little ones. That's why we have added the option to display a sticker rewards page instead.

The sticker rewards page is really simple. At the end of each session, users will see a sticker rewards page and they can add one sticker by dragging it to their collection. Each time you switch users or relaunch the app, you will see a new sticker rewards page and get a selection of new stickers.
Getting Started
Bitsboard Games
Bitsboard Classes
02 - How to use Bitsboard Classes?
Accessibility
Need more help?
email us at support @
grasshopperapps.com